Spinning up your operator
This chapter covers
-
Kubernetes deployment guide for operators 3
-
Understanding the scope of operator deployments
-
Learning to debug an operator
-
The challenges of scope deployments
In this chapter, we will go over strategies to deploy an operator to a Kubernetes cluster. First, to run the operator locally. And secondly, learn to deploy operators on a Kubernetes cluster by building an image of the operator and how to deploy the operator using the image to a Kubernetes cluster. We will reference the GitOps operator example in the previous chapter, but the steps remain the same for any other operator. We will also learn how to debug the operator and configure standard development tools to debug operators. Next, we will understand the scope of deploying an operator to a Kubernetes cluster. Learn to choose between namespace scope vs. cluster scope deployment, understanding the benefits and challenges with both deployment modes.
3.1 How to deploy an operator to Kubernetes
There are several ways to deploy a Kubernetes operator to a Kubernetes cluster. There are a variety of ways to deploy Kubernetes operators, including:
-
Running an operator local: Recommended for development only. Running locally also gives us the ability to debug the operator.
-
Deploying to a Kubernetes cluster using the operator image: Deploy operator like any other application deployment to Kubernetes requires building and deploying an image.
-
Operator Lifecycle Management (OLM): It is an operator that provides a declarative way to install, manage, and upgrade other operators on a Kubernetes cluster.
-
Using Helm Charts: Helm is a package manager for Kubernetes that allows you to define, install, and manage applications. It is possible to create an operator’s Helm chart.
-
Deploy an operator through Operator Hub: a public registry of operators that can be easily installed and managed in Kubernetes clusters.
In this section, we will focus on two deployment types for operators. First, we will describe the process for getting an operator running locally. Next, we will explain using a locally operational operator to debug the operator code. Finally, we can review the steps for deploying the operator on a Kubernetes cluster. Figure 3.1 shows a high-level overview of the two deployment types. We will discuss the use cases for these deployment methods.
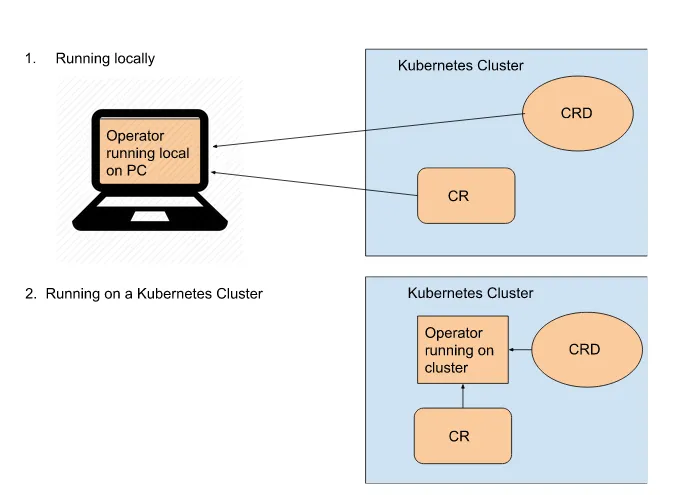
Figure 3.1 Deployment types for the operator.
We will use the GitOps java operator to showcase deployment locally and deploy on the cluster. The steps required to deploy any operator will follow a similar approach, including deploying CRD specifications for the custom resource and running the operator components with additional configurations, such as permissions. We will go through each step in depth in the following sections.
3.1.1: Running operator locally
The main reason to deploy an operator locally is to ensure the operator code compiles and runs before building containers and deploying them to a cluster. Operators can run on your local computer if you connect via kubectl to a Kubernetes cluster. Your local development environment will act like a container running on the cluster.
Before we start, it is always good to nail down some of the prerequisites we use in the GitOps operator with Quarkus, the Operator SDK, Maven, and Java.
-
Operator SDK version 1.21.0
-
Quarkus SDK version 4.0.3
-
Quarkus version 3.1.2
-
Maven version 3.10.1
-
Java version 11
Let’s start running an operator locally; out of the box, the Operator SDK and Quarkus SDK create Make commands in the Makefile that allow building automation for software on Unix and Unix-like operating systems. They also create Maven commands, which we can use to get the operator running locally. As we are using a Java-based operator, it is a maven command we will operate from the root of our java-operator-ex project: https://github.com/k8soperators/examples/tree/main/code/java-operator-ex. We will then create a namespace called gitops, as shown in Listing 3.1.
Listing 3.1 Create a project and upload the CRD
$ mvn package[INFO] Scanning for projects...[INFO][INFO] --------------< com.github.k8soperators:java-operator-ex >--------------[INFO] Building java-operator-ex 0.0.1-SNAPSHOT[INFO] --------------------------------[ jar ]---------------------------------# comment lines[INFO] Adding existing ClusterRole with name: java-operator-ex.[INFO] Adding existing ServiceAccount with name: java-operator-ex.[INFO] Adding existing ClusterRoleBinding with name: java-operator-ex.[INFO] [io.quarkiverse.operatorsdk.deployment.QuarkusControllerConfigurationBuilder] Processed 'com.github.k8soperators.GitOpsReconciler' reconciler named 'gitopsreconciler' for 'gitops.com.github.k8soperators' resource (version 'com.github.k8soperators/v1alpha1')[INFO] Generating 'gitops.com.github.k8soperators' version 'v1alpha1' with com.github.k8soperators.GitOps (spec: com.github.k8soperators.GitOpsSpec / status com.github.k8soperators.GitOpsStatus)...[INFO] [io.quarkiverse.operatorsdk.deployment.OperatorSDKProcessor] Generated gitops.com.github.k8soperators CRD:# comment lines[INFO] [io.quarkiverse.operatorsdk.bundle.deployment.BundleProcessor] Generating CSV for java-operator-ex controller -> /home/austincunningham/repo/examples/code/java-operator-ex/target/bundle/java-operator-ex/manifests/java-operator-ex.clusterserviceversion.yaml[INFO] [io.quarkiverse.operatorsdk.bundle.deployment.BundleProcessor] Generating annotations for java-operator-ex controller -> /home/austincunningham/repo/examples/code/java-operator-ex/target/bundle/java-operator-ex/metadata/annotations.yaml[INFO] [io.quarkiverse.operatorsdk.bundle.deployment.BundleProcessor] Generating bundle for java-operator-ex controller -> /home/austincunningham/repo/examples/code/java-operator-ex/target/bundle/java-operator-ex/bundle.Dockerfile[INFO] [io.quarkiverse.operatorsdk.bundle.deployment.BundleProcessor] Generating Custom Resource Definition for java-operator-ex controller -> /home/austincunningham/repo/examples/code/java-operator-ex/target/bundle/java-operator-ex/manifests/gitops.com.github.k8soperators-v1.crd.yml[INFO] [io.quarkus.container.image.jib.deployment.JibProcessor] Starting (local) container image build for jar using jib.[INFO] [io.quarkus.container.image.jib.deployment.JibProcessor] Using docker to run the native image builder# comment lines[INFO] [io.quarkus.container.image.jib.deployment.JibProcessor] Created container image austincunningham/java-operator-ex:0.0.1-SNAPSHOT (sha256:067fec03f502103b5a4a6de729c31242ef7935c65fddb56321886a3cbc676426)
****
[INFO] [io.quarkus.deployment.QuarkusAugmentor] Quarkus augmentation completed in 7504ms[INFO] ------------------------------------------------------------------------[INFO] BUILD SUCCESS[INFO] ------------------------------------------------------------------------[INFO] Total time: 10.521 s[INFO] Finished at: 2023-07-19T20:16:19+01:00[INFO] ------------------------------------------------------------------------$ kubectl create namespace gitopsnamespace/gitops createdYou should note that after running the mvn package command, we see a target directory added to our local codebase with many subdirectories. At this point, we are only concerned with the target root directory. In this directory, a jar file is generated called java-operator-ex-dev.jar, which we can run using the Java runtime to run the operator locally. The Quarkus Operator SDK comes with another inbuilt maven command mvn quarkus:dev, for running locally, which we can see in Listing 3.2 along with the operator logs output as standard out. This maven command will also create and upload the CRD to the cluster. We can kill the process with ctrl-c or use q to quit, but we will leave it running for now.
Listing 3.2 Running your operator locally
$ mvn quarkus:dev__  ____  __  _____   ___  __ ____  ______ --/ __ \/ / / / _ | / _ \/ //_/ / / / __/ -/ /_/ / /_/ / __ |/ , _/ ,< / /_/ /\ \--\___\_\____/_/ |_/_/|_/_/|_|\____/___/2023-07-19 20:19:22,291 INFO  [io.qua.ope.run.ConfigurationServiceRecorder] (Quarkus Main Thread) Leader election deactivated because it is only activated for [prod] profiles. Currently active profiles: [dev]
****
# comment lines2023-07-19 20:19:22,371 INFO  [io.jav.ope.pro.Controller] (Controller Starter for: gitopsreconciler) Starting 'gitopsreconciler' controller for reconciler: com.github.k8soperators.GitOpsReconciler, resource: com.github.k8soperators.GitOps2023-07-19 20:19:22,793 WARN  [io.fab.kub.cli.dsl.int.VersionUsageUtils] (InformerWrapper [gitops.com.github.k8soperators/v1alpha1] 170) The client is using resource type 'gitops' with unstable version 'v1alpha1'2023-07-19 20:19:23,173 INFO  [io.jav.ope.pro.Controller] (Controller Starter for: gitopsreconciler) 'gitopsreconciler' controller started2023-07-19 20:19:23,211 INFO  [io.quarkus] (Quarkus Main Thread) java-operator-ex 0.0.1-SNAPSHOT on JVM (powered by Quarkus 3.1.2.Final) started in 4.423s. Listening on: http://localhost:80802023-07-19 20:19:23,214 INFO  [io.quarkus] (Quarkus Main Thread) Profile dev activated. Live Coding activated.2023-07-19 20:19:23,214 INFO  [io.quarkus] (Quarkus Main Thread) Installed features: [cdi, kubernetes, kubernetes-client, micrometer, openshift-client, operator-sdk, smallrye-context-propagation, smallrye-health, vertx]            #A
****
--Tests pausedPress [r] to resume testing, [o] Toggle test output, [:] for the terminal, [h] for more options>                                                          #B
****
#A Once we get to this point in the logs, our operator is functioning
#B This is an interactive output that can be access by the keyboard commands
An overview of the GitOps operator running locally can be seen in Figure 3.3. The namespace associated with this locally running operator will be the namespace you are connected to with kubectl.
NOTE When running the operator locally, you are acting as kube:admin user, a default administrator user for the Kubernetes cluster, and the operator will have all permissions to modify resources. We will see how to define permissions for operators in section 3.2.1.
****
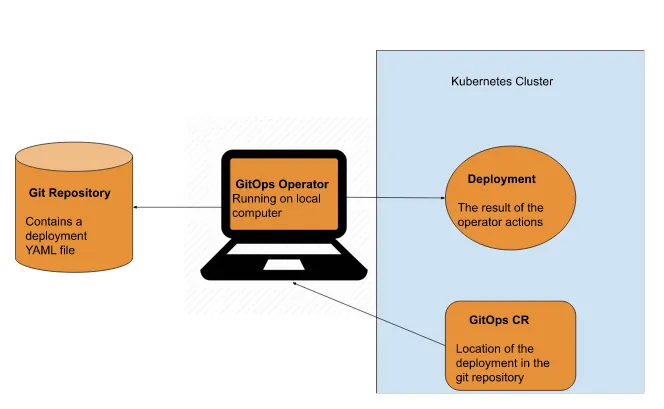
Figure 3.2 Operator running locally.
With the operator running locally, we can create and deploy the CR shown in listing 3.3 with the kubectl apply command with EOF. We can check the status of the CR and confirm that the pod and service are up.
Listing 3.3 Deploy the CR
$ kubectl apply -f - <<EOF---apiVersion: com.github.k8soperators/v1alpha1kind: GitOpsmetadata: name: gitops-sample namespace: gitopsspec: url: "https://raw.githubusercontent.com/k8soperators/sample-yamls/main/kubernetes-quickstart/src/kubernetes/kind.yml"EOF $ kubectl get gitops gitops-sample -n gitops -oyaml | grep -A 10 “status:” #Astatus: message: "" phase: READY resources: - apiVersion: apps/v1 kind: Deployment name: demo-app - apiVersion: v1 kind: Service name: demo-app$ kubectl get pods --namespace=gitops #BNAME READY STATUS RESTARTS AGEdemo-app-54ccb85644-hmxkv 1/1 Running 1 1mjava-operator-ex-6cc4ffcffc-cvqpz 1/1 Running 1 7m$ kubectl get service demo-app --namespace=gitops -oyaml #Ckind: ServiceapiVersion: v1metadata: annotations: app.quarkus.io/build-timestamp: '2022-12-16 - 16:20:54 +0000' resourceVersion: '2156593' name: demo-app uid: a66124f5-3a6c-47b4-bcaa-5db394f15df4 creationTimestamp: '2023-06-27T19:26:43Z' managedFields:... namespace: java-operator-ex ownerReferences: - apiVersion: com.github.k8soperators.ch3/v1alpha1 kind: GitOps name: java-operator-ex-sample uid: c8895bdd-528d-4d5c-a0ce-3c0167b91c07 labels: app.kubernetes.io/name: demo-app app.kubernetes.io/version: latestspec: clusterIP: 10.217.5.240 externalTrafficPolicy: Cluster ipFamilies: - IPv4 ports: - name: http protocol: TCP port: 80 targetPort: 8080 nodePort: 31182 internalTrafficPolicy: Cluster clusterIPs: - 10.217.5.240 type: NodePort ipFamilyPolicy: SingleStack sessionAffinity: None selector: app.kubernetes.io/name: demo-app app.kubernetes.io/version: lateststatus: loadBalancer: {}#A Command to get the status of the GitOps custom resource
#B Command will return one pod call demo-app-<some sha> that is of STATUS Running
#C Command will return the service YAML for demo-app
3.1.2: Debug operators
It is essential for all development flows to be able to debug your software, operators are no exception. The Quarkus Operator SDK gives us this tooling out of the box with the mvn quarkus:dev command. This command gives us by default a port, 5005, to which we can attach a debug process in order to debug.
Let’s get started. First, we run the mvn quarkus:dev command from the command line. Once the operator is started locally, we can use any IDE to attach to the process on the 5005 port. Let’s demonstrate this with a couple of common IDEs, such as VS Code, IntelliJ, and Eclipse.
Visual Studio Code debugging
In Visual Studio Code (VS Code), we create a launch.json with attach using the configuration in listing 3.4
Listing 3.4 VS Code launch config for attaching to process on port 5005
{ "version": "0.2.0", "configurations": [ { "type": "java", "name": "Attach", "request": "attach", "hostName": "localhost", "port": "5005" }, ]}We can then select “Run” and “Start Debugging” from the VS Code dropdown menu to start the debugging process as shown in figure 3.4.
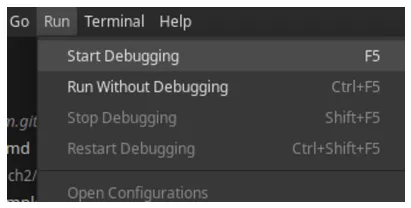
Figure 3.3 The Start Debugging option in the VS Code Run menu
IntelliJ IDEA debugging
In IntelliJ, we can select “Run” and “Attach to Process” from the IntelliJ dropdown menu as shown in figure 3.5
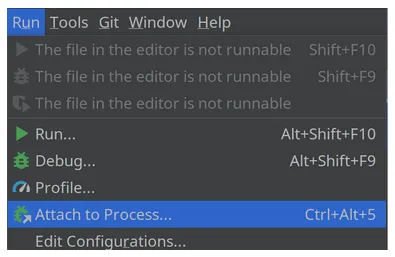
Figure 3.4 Attach to Process on the Run dropdown menu in IntelliJ.
This will give you a pop-up screen with the option to select the jar file java-operator-ex-dev.jar automatically running on our project on port 5005, as shown in figure 3.6. Once the file is selected, you will be in debug mode.

Figure 3.5 IntelliJ Attach to the jar file java-operator-ex-dev.jar on port 5005
Eclipse debugging
In the Eclipse IDE, go to “Run” and “Debug Configurations…” from the dropdown menu. You can then select “Remote Java Application.” We give it the name gitops and change the port to 5005, as shown in Figure 3.7. You can see that Eclipse will pick up project java-operator-ex automatically. Finally, press the “Debug” button to start the debug procedure.
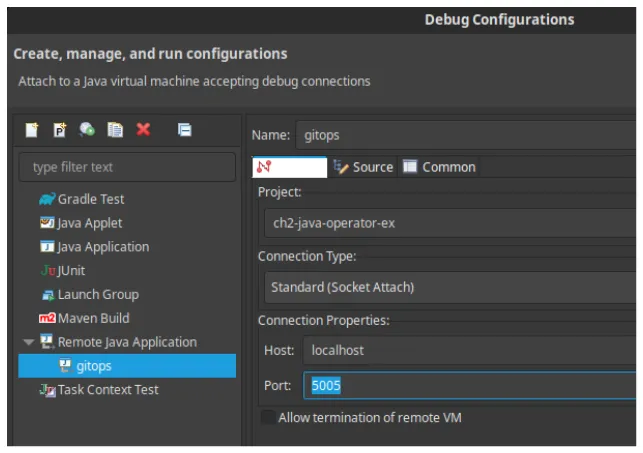
Figure 3.6 Eclipse Remote Java Application configuration
Many IDEs have the capability to attach to a process on a port, although the steps taken can look quite different in each case. We can start adding breakpoints, stepping through the code, and adding watches to variables.
3.1.3: Running operator on Kubernetes
We will build an operator container from our local code base and deploy it to a Kubernetes cluster. We previously bootstrapped the project and uploaded the CRD using the Maven command mvn quarkus:dev. Now we will build and deploy all the components onto a Kubernetes cluster.
Before we start, we will briefly discuss what needs to be installed on a Kubernetes cluster for an operator to function. Figure 3.8 shows several components required for a viable operator to function.
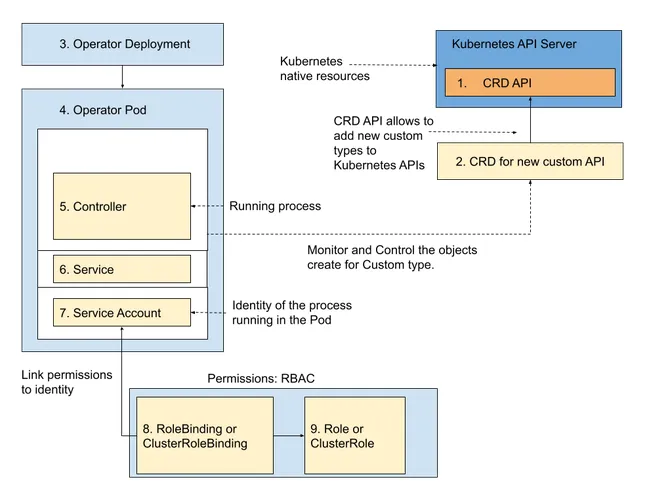
Figure 3.7 Core components required for an operator to function 1. Kubernetes CRD API endpoint, 2. New CRD adding custom kind, 3. Operator deployment for operator installation, 4. Operator pod where the code lives, 5. Controller watches the CRD kind for changes, 6. Service for operator health and metrics monitoring, 7.Service account, 8.RoleBinding or ClusterRoleBinding, 9. Role or ClusterRole
The Kubernetes API server has a CRD API endpoint for accepting new CRD. When we upload the new CRD, the CRD API acts upon it. Our new kind is then defined, and the API endpoint for our new CRD is available on the Kubernetes API. Next, upload the operator deployment YAML. This will contain an operator container image and everything needed to get our operator started. This will, in turn, set about creating the operator pod. The operator pod is where the operator code runs and lives. Part of that code is the controller, which watches for instances of the kind defined by the CRD. A service is exposed as part of this installation that exposes the metrics endpoint on port 8080, which can be used to monitor the operator. A second endpoint can be exposed for the health probe endpoint on port 8081, which can be used to check the health and readiness of an operator pod. We will also install a service account. The operator pod owns this service account. The service account is an access mechanism for role-based access control. As part of the role-based access control, we require a Role binding, or cluster role binding, which ties the service account to a role that defines its permissions. It will be cluster role binding if the permissions needed are cluster-wide. A role, or cluster role, is also required, which defines the permissions and access level to resources on the cluster, such as the CRD kind. Again, it will be a cluster role if the scope of the permissions needs to be cluster-wide. Service accounts, Role Bindings, and Roles are closely tied together to allow access to resources on a Kubernetes cluster. We will discuss role-based access control (RBAC) further in Section 3.2.
Now that we are familiar with the components required for the operator to function let’s start installing our operator on a cluster. First, we will use the make install command, shown in Listing 3.5, to upload the CRD to the cluster. We will also confirm that the CRD is present on the cluster with a kubectl command.
Listing 3.5 Build and deploy CRD
$ mvn package$ kubectl create namespace gitops #A$ make install #Bcustomresourcedefinition.apiextensions.k8s.io/gitops.com.github.k8soperators created$ kubectl get crd gitops.com.github.k8soperators -oyaml #CapiVersion: apiextensions.k8s.io/v1kind: CustomResourceDefinitionmetadata: annotations:... creationTimestamp: "2023-06-10T11:25:37Z" generation: 1 managedFields: ... name: gitops.com.github.k8soperators resourceVersion: "323490" uid: 632460d5-9d42-4322-be32-993c47caa3a8spec: conversion: strategy: None group: com.github.k8soperators names: kind: GitOps listKind: GitOpsList plural: gitops singular: gitops scope: Namespaced versions: - name: v1alpha1 schema: openAPIV3Schema: properties: spec: properties: url: type: string type: object status: properties: message: type: string phase: enum: - FAILED - UNKNOWN - ENUM$VALUES - READY type: string resources: items: properties: apiVersion: type: string kind: type: string name: type: string type: object type: array type: object type: object served: true storage: true subresources: status: {}status: acceptedNames: kind: GitOps listKind: GitOpsList plural: gitops singular: gitops conditions: - lastTransitionTime: "2023-06-10T11:25:37Z" message: no conflicts found reason: NoConflicts status: "True" type: NamesAccepted - lastTransitionTime: "2023-06-10T11:25:37Z" message: the initial names have been accepted reason: InitialNamesAccepted status: "True" type: Established storedVersions: - v1alpha1
****#A Creating the gitops namespace
#B Command installs the CRD on the cluster
#C Command to confirm the install of the CRD on the cluster in YAML format
Again, after running the mvn package command, we see a target directory added to our local codebase. This time we are only interested in the target/kubernetes directory. We will use this directory to deploy the operator.
Next, we will need to build an operator container image, and the Operator SDK provides a make command to do this for us as well in Listing 3.6. We will generate the container and push it to a container registry in this case, Docker Hub using the Docker CLI we could also use Podman CLI for this task. You will need to have a Docker Hub account to complete this step. Although you can use any registry, we will continue these instructions in an opinionated way.
Listing 3.6 Build an operator container image
$ make docker-build[INFO] BUILD SUCCESS #A$ docker images #BREPOSITORY TAG IMAGE ID CREATED SIZE<user name>/java-operator-ex 0.0.1-SNAPSHOT <some sha> 18 seconds ago 412MB$ docker push <user name>/java-operator-ex:0.0.1-SNAPSHOT #C#A Build Success will be part of the output from running make docker-build to indicate the command was successful
#B Confirm the image has been successfully created with docker images to list the local images built on your computer. The user name will be your own docker credentials.
#C We can push the container to a container registry using docker push; in this case, it’s the Docker Hub
Next, we will install the operator to the Kubernetes cluster. By running the mvn package command previously, the Quarkus Operator SDK has already generated YAML files in target/kubernetes/kubernetes.yml for a deployment, a service, a service account, a Role, a Rolebinding, a ClusterRole, and a ClusterRoleBinding: all the elements shown in figure 3.8. We can see the contents of the kubernetes.yml in Listing 3.7, and we have a make command to add them to the cluster, as shown in Listing 3.8.
Listing 3.7 Contents of kubernetes.yml
$ cat target/kubernetes/kubernetes.yml---apiVersion: v1kind: ServiceAccount #Ametadata: # comment lines name: java-operator-ex---apiVersion: rbac.authorization.k8s.io/v1kind: ClusterRole #Bmetadata: # comment lines name: java-operator-exrules: - apiGroups: - apiextensions.k8s.io resources: - customresourcedefinitions verbs: - get - list - watch - apiGroups: - com.github.k8soperators resources: - gitops - gitops/status verbs: - get - list - watch - create - delete - patch - update - apiGroups: - apps - extensions resources: - deployments - deployments/status verbs: - get - list - watch - create - delete - patch - update - apiGroups: - "" resources: - services - configmaps - secrets verbs: - get - list - watch - create - delete - patch - update---apiVersion: rbac.authorization.k8s.io/v1kind: ClusterRoleBinding #Cmetadata: # comment lines name: java-operator-exroleRef: kind: ClusterRole apiGroup: rbac.authorization.k8s.io name: java-operator-exsubjects: - kind: ServiceAccount name: java-operator-ex---apiVersion: rbac.authorization.k8s.io/v1kind: RoleBindingmetadata: name: java-operator-ex-viewroleRef: kind: ClusterRole apiGroup: rbac.authorization.k8s.io name: viewsubjects: - kind: ServiceAccount name: java-operator-ex---apiVersion: v1kind: Service #Dmetadata: # comment lines name: java-operator-exspec: ports: - name: https port: 443 protocol: TCP targetPort: 8443 - name: http port: 80 protocol: TCP targetPort: 8080 selector: app.kubernetes.io/name: java-operator-ex app.kubernetes.io/version: 0.0.1-SNAPSHOT type: ClusterIP---apiVersion: apps/v1kind: Deployment #Emetadata: # comment lines name: java-operator-exspec: replicas: 1 selector: matchLabels: app.kubernetes.io/name: java-operator-ex app.kubernetes.io/version: 0.0.1-SNAPSHOT template: metadata: # comments lines spec: containers: - env: - name: KUBERNETES_NAMESPACE valueFrom: fieldRef: fieldPath: metadata.namespace image: k8soperators/java-operator-ex:0.0.1-SNAPSHOT imagePullPolicy: Always livenessProbe: failureThreshold: 3 httpGet: path: /q/health/live port: 8080 scheme: HTTP initialDelaySeconds: 5 periodSeconds: 10 successThreshold: 1 timeoutSeconds: 10 name: java-operator-ex ports: - containerPort: 8443 name: https protocol: TCP - containerPort: 8080 name: http protocol: TCP readinessProbe: failureThreshold: 3 httpGet: path: /q/health/ready port: 8080 scheme: HTTP initialDelaySeconds: 5 periodSeconds: 10 successThreshold: 1 timeoutSeconds: 10 startupProbe: failureThreshold: 3 httpGet: path: /q/health/started port: 8080 scheme: HTTP initialDelaySeconds: 5 periodSeconds: 10 successThreshold: 1 timeoutSeconds: 10 serviceAccountName: java-operator-ex#A Service account used to access RBAC
#B Roles and ClusterRoles with the access permissions the operator needs. Note that we have both ClusterRoles and Roles as we can determine if we want to deploy the operator in cluster scope, which will use ClusterRoles, or namespace scoped, which will use Roles.
#C RoleBindings and ClusterRoleBindings tie the Roles and ClusterRoles to the service account
#D Service used for metrics and health endpoints for the operator
#E Deployment for the operator pod
Listing 3.8 Deploy the operator resources
$ make deploy #Akubectl apply -f target/kubernetes/kubernetes.ymlserviceaccount/java-operator-ex createdservice/java-operator-ex createdrolebinding.rbac.authorization.k8s.io/java-operator-ex-view createdrolebinding.rbac.authorization.k8s.io/gitopsreconciler-role-binding createdclusterrole.rbac.authorization.k8s.io/gitopsreconciler-cluster-role createdclusterrole.rbac.authorization.k8s.io/josdk-crd-validating-cluster-role createdclusterrolebinding.rbac.authorization.k8s.io/gitopsreconciler-crd-validating-role-binding createddeployment.apps/ch3-java-operator-ex configured#A Make command that applies a YAML file from target/kubernetes/kubernetes.yml,the YAML file contains YAML for service accounts, service, roles, rolebindings, clusterroles and clusterrole bindings and the deployment YAML for the operator which we can see from standard out.
We can see if our deployment was successful by confirming that the operator pod has started and that its logs are in a good state by getting the pod status as shown in listing 3.9 and outputting the logs shown in Figure 3.9.
Listing 3.9 Check the operator deployment
$ kubectl get pod java-operator-ex-<sha> -namespace=gitops -oyaml | grep -A 10 “status:”status: phase: Running conditions: - type: Initialized status: 'True' lastProbeTime: null lastTransitionTime: '2023-06-27T07:56:04Z' - type: Ready status: 'True' lastProbeTime: null lastTransitionTime: '2023-07-07T16:43:43Z'$ kubectl log java-opertor-ex-<sha>__ ____ __ _____ ___ __ ____ ______ --/ __ \/ / / / _ | / _ \/ //_/ / / / __/ -/ /_/ / /_/ / __ |/ , _/ ,< / /_/ /\ \--\___\_\____/_/ |_/_/|_/_/|_|\____/___/2023-07-19 20:19:22,291 INFO [io.qua.ope.run.ConfigurationServiceRecorder] (Quarkus Main Thread) Leader election deactivated because it is only activated for [prod] profiles. Currently active profiles: [dev]
****
# comment lines2023-07-19 20:19:22,371 INFO [io.jav.ope.pro.Controller] (Controller Starter for: gitopsreconciler) Starting 'gitopsreconciler' controller for reconciler: com.github.k8soperators.GitOpsReconciler, resource: com.github.k8soperators.GitOps2023-07-19 20:19:22,793 WARN [io.fab.kub.cli.dsl.int.VersionUsageUtils] (InformerWrapper [gitops.com.github.k8soperators/v1alpha1] 170) The client is using resource type 'gitops' with unstable version 'v1alpha1'2023-07-19 20:19:23,173 INFO [io.jav.ope.pro.Controller] (Controller Starter for: gitopsreconciler) 'gitopsreconciler' controller started2023-07-19 20:19:23,211 INFO [io.quarkus] (Quarkus Main Thread) java-operator-ex 0.0.1-SNAPSHOT on JVM (powered by Quarkus 3.1.2.Final) started in 4.423s. Listening on: http://localhost:80802023-07-19 20:19:23,214 INFO [io.quarkus] (Quarkus Main Thread) Profile dev activated. Live Coding activated.2023-07-19 20:19:23,214 INFO [io.quarkus] (Quarkus Main Thread) Installed features: [cdi, kubernetes, kubernetes-client, micrometer, openshift-client, operator-sdk, smallrye-context-propagation, smallrye-health, vertx] #A
****#A Note we don’t have access to the interactive tooling as we did when we ran mvn quarkus:dev as in listing 3.2. Again getting to this point shows the operator is in a healthy state
Finally, as our operator is now deployed, we can create a CR, which will give our operator the location of our deployment on git and all the deployment to proceed, as shown in Figure 3.10.
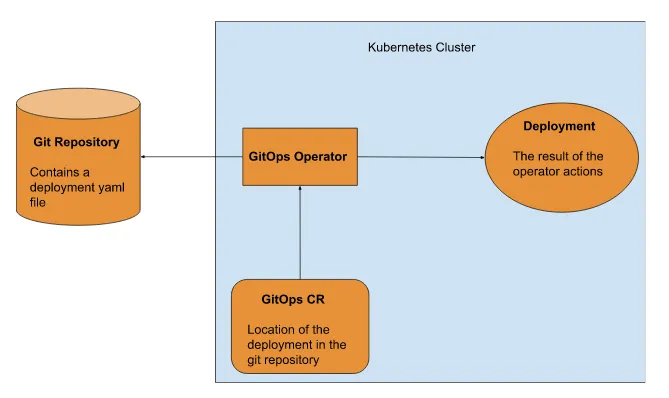
Figure 3.8 Overview for the GitOps operator installed on a Kubernetes cluster
We can deploy the CR as shown in Listing 3.10 with the kubectl apply command with EOF and check the status as shown in Listing 3.11
Listing 3.10 Deploy the CR and check the status
$ kubectl apply -f - <<EOF---apiVersion: com.github.k8soperators/v1alpha1kind: GitOpsmetadata: name: java-operator-ex-sample namespace: java-operator-exspec: url: "https://raw.githubusercontent.com/k8soperators/sample-yamls/main/kubernetes-quickstart/src/kubernetes/kind.yml"EOFListing 3.11 Check the CR status
$ kubectl get gitops gitops-sample -n gitops -oyaml | grep -A 10 “status:” #Astatus: message: "" phase: READY resources: - apiVersion: apps/v1 kind: Deployment name: demo-app - apiVersion: v1 kind: Service name: demo-app#A Command to get the status of the GitOps custom resource
Finally, our operator has installed our deployment from our git directory, and we have a new pod and service running, as confirmed by the status output in listing 3.9.
Although not part of deploying an operator, it is good practice to test your operator’s functionality to ensure the operator functions as expected. We will update the deployment in the sample-yamls project https://github.com/k8soperators/sample-yamls.git. After pulling it locally, we can edit the deployments replicas in the kubernetes-quickstart/src/kubernetes/kind.yml file. After we push the changes, we will see the number of pods increase to 2, and we will see the metadata generation increase, as shown in listing 3.12. This shows that the operator is acting on changes made in the GitHub repository.
Listing 3.12 Clone the sample-yamls project and update the deployment replicas
$ git clone git@github.com:k8soperators/sample-yamls.git$ cd sample-yamls/kubernetes-quickstart/src/kubernetes/$ sed -i 's/replicas: .*/replicas: 2/' kind.yml #A$ git add kind.yml$ git commit -m “update replicas”$ git push origin main$ kubectl get pods --namespace=gitops #BNAME READY STATUS RESTARTS AGEdemo-app-54ccb85644-hmxkv 2/2 Running 2 1mjava-operator-ex-6cc4ffcffc-cvqpz 1/1 Running 1 47h$ kubectl get deployment demo-app -o=jsonpath='{.metadata.generation}' #C2$ kubectl get deployment demo-app -o=jsonpath='{.status.availableReplicas}' #D2# A sed command to patch the number of replicas in a kind.yml file to 2, you could also just manually edit the file.
# B This command will return 3 pods, one for the operator pod and 2 for the increase in the deployment.
# C This command will return the metadata generation. Generation tracks the changes to Kubernetes objects. This is the second time we have changed the deploymen,t so this command will return 2
# D This command will return the number of replicas in the status, which will also be 2.
3.2 Scope of operator deployment
There are three scopes to manage resources in Kubernetes: namespace, multi-namespace, and cluster-wide. Scoping the Kubernetes resource helps in isolation and better ways to manage resources for the developers and the system administrators.
Namespace-scoped resources isolate the resources for users within the namespace boundaries. A cluster-wide scope makes resources available to all namespaces within the cluster, while multiple namespaces manage resources in more than one namespace cluster. Figure 3.9 shows operator deployment in the namespace and cluster scope mode. In the namespace scope, the operator only controls the CR in the specified namespace. However, in the cluster scope, the operator will manage CRs in all the namespaces or specific groups of namespaces.
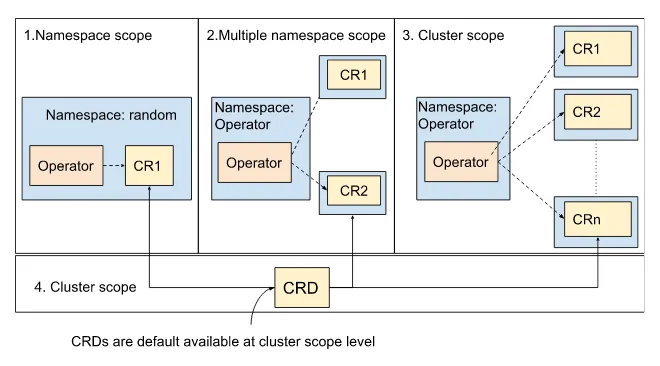
Figure 3.9 Operator deployed as namespace scope, multiple namespace scope, and cluster scope; as the CRD is an extension of the Kubernetes API, they are cluster scoped automatically.
Cluster and multiple-namespace scope make the operator reusable across the Kubernetes cluster over namespace scope deployment. CRDs are deployed at the cluster level, meaning you deploy the operator in namespace and cluster-wide mode in a Kubernetes cluster. Both deployments refer to the same CRD.
NOTE CRDs are defined at the cluster scope level, even if the resources are at the namespace scope level.
Kubernetes controls scope isolation through authorization and access management. Kubernetes uses RBAC as the default authorization mechanism to isolate the resources in the namespace and cluster scope boundaries.
3.2.1 How to define permission for your operator
Kubernetes operators require appropriate permissions to perform their tasks. You must define these permissions when developing your operators. Defining permissions for your operator requires the following components:
-
Identity of the Operator: referred to as Subject in Kubernetes
-
Permissions: A set of rules determining the operator’s actions on the Kubernetes resources.
Identity of the operator
The reconciler process in an operator acts by requesting the Kubernetes API server. The Kubernetes operator uses a Service Account to authenticate with the Kubernetes API server, as shown in Figure 3.10. In Kubernetes, service accounts represent a running process’s identity.
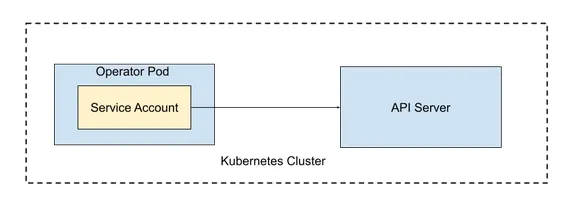
Figure 3.10 Operator uses a service account to authenticate with the Kubernetes API server.
Kubernetes API server authenticates a request from an operator by verifying the service account. However, an operator can only modify resources depending on their service account permissions. We will examine how to apply permissions for a service account with the help of RBAC in Kubernetes. First, we can look at the service account created when we deploy an operator to a Kubernetes cluster. Operator tools like Operator SDK automatically generate the service account configuration. Check the created service account for the GitOps operator example, as listed in listing 3.13.
Listing 3.13 Service account for the operator
kubectl get serviceaccounts java-operator-ex -o yamlapiVersion: v1kind: ServiceAccountmetadata: annotations: labels: app.kubernetes.io/managed-by: quarkus name: java-operator-ex #A namespace: default #B#A Name of the service account.
#B Namespace to which the service account applies.
To allow the operator to modify the resource or custom resource in Kubernetes will require assigning permission to the service account used by the operator.
The Kubernetes RBAC permissions are defined using Roles, which tell “what” actions are allowed for a group of resources in Kubernetes. And RoleBinding allocates the rules to a Subject, allowing “who” can perform the action defined in a role. Figure 3.13 shows the components required to determine permissions for the operator service account, i.e., Role and RoleBinding.
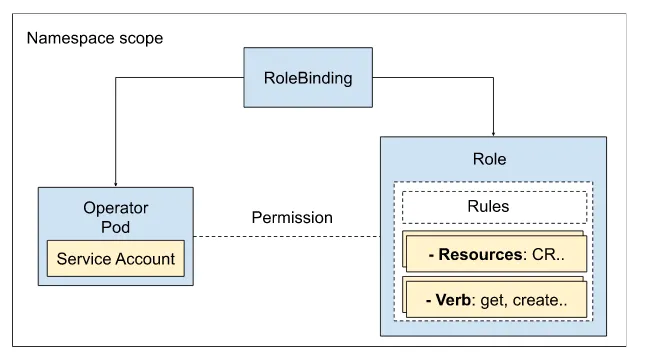
Figure 3.11 RBAC permission assigned to the operator service account
Role
The Role consists of rules defined through three elements:
-
apiGroups: Specify a list of the resources API groups. For example, “com.github.k8soperators” for GitOps custom resource
-
Resources: List of resources part of specified apiGroups. For example custom resource “GitOps:
-
Verbs: Set of permitted actions such as get, list, create, etc.
For example, To create or modify the GitOps resource type, the service account of the GitOps operator will require permission to perform actions such as get, list, watch, create, delete, and _updat_e on the custom resource types: GitOps, GitOps/status. Let us define a Role for the GitOps operator as shown in Listing 3.14.
Listing 3.14 Role
apiVersion: rbac.authorization.k8s.io/v1kind: Rolemetadata: name: gitopsreconciler-role #A namespace: default #Brules: - apiGroups: - "apiextensions.k8s.io" resources: # Required by the Java Operator SDK - 'customresourcedefinitions' verbs: - get - list - watch - apiGroups: - com.github.k8soperators #C resources: #D - gitops - gitops/status verbs: #E - get - list - watch - create - delete - patch - update…#A Refers to the Role name.
#B Namespace for which this role is applicable. Every role has a namespace associated with it.
#C “com.github.k8soperators” indicates the custom API group.
#D List of custom resources to which the rule applies.
# List of verbs allowed by the GitOps API to the associated subjects.
RoleBinding
RoleBinding links the operator service account with the Role to a namespace-scoped boundary. RoleBindig consists of roleRef and subjects components, where roleRef is a reference to a ClusterRole and subjects allow setting a list of service accounts or users.
Let’s define a RoleBinding for the GitOps operator in listing 3.15.
Listing 3.15 RoleBinding
apiVersion: rbac.authorization.k8s.io/v1kind: RoleBindingmetadata: name: gitopsreconciler-role namespace: defaultroleRef: kind: Role #A apiGroup: rbac.authorization.k8s.io name: gitopsreconciler-roleSubjects: #B - kind: ServiceAccount #C name: java-operator-ex#A Reference to the Role with the name gitopsreconciler-role shown in Listing 3.15
#B List of subjects links to a Role
#C Service account with name java-operator-ex
With the Role and RoleBinding in place, the operator has permission to perform operations such as creating a GitOps CR, listing GitOps CR, watching the change to GitOps CR, etc. Role and RoleBindings scope the permissions at the namespace level, while ClusterRole and ClusterRoleBinding expand the permission scope to the cluster level.
ClusterRole and ClusterRoleBindings
ClusterRoles follow the same pattern as Roles but at the Kubernetes cluster-wide level. Cluster scope resources include CRDs, Persistent Volumes, Storage classes, Nodes, etc. ClusterRoleBinding allows linking the operator’s service account to a ClusterRole, which allows the GitOps operator service account to modify the CR in all namespaces, as shown in Figure 3.12.
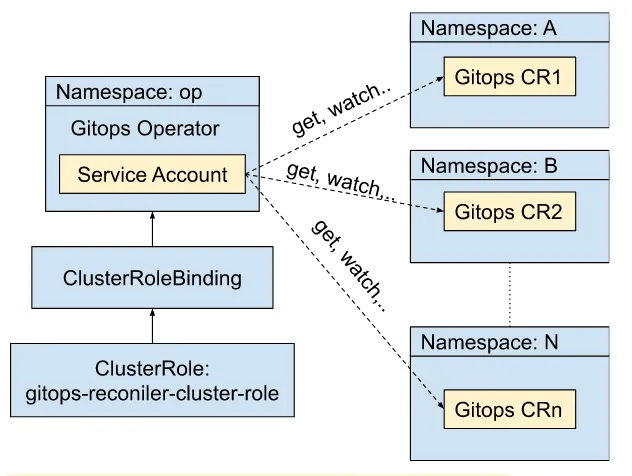
Figure 3.12 Cluster-wide permission assigned to the GitOps service account
We can examine the ClusterRole and ClusterRoleBinding for deploying the GitOps operator as cluster-scoped. When defining a ClusterRole and ClusterRoleBinding, specifying a namespace is not required. This allows binding a service account to cluster-wide privileges. Let’s define a cluster role for the GitOps operator in listing 3.16 and the cluster role binding in listing 3.17.
Listing 3.16 ClusterRole
apiVersion: rbac.authorization.k8s.io/v1kind: ClusterRolemetadata: name: java-operator-ex #ARules: #B - apiGroups: - "apiextensions.k8s.io" resources: # Required by the Java Operator SDK - 'customresourcedefinitions' verbs: - get - list - watch - apiGroups: - com.github.k8soperators resources: - gitops - gitops/status verbs: - get - list - watch - create - delete - patch - update#A Name of the ClusterRole, but no namespace declaration
#B Rules as similar to Role definition
Define a ClusterRoleBinding to bind service account with the ClusterRole.
Listing 3.17 ClusterRoleBinding
apiVersion: rbac.authorization.k8s.io/v1kind: ClusterRoleBindingmetadata: name: java-operator-exroleRef: kind: ClusterRole apiGroup: rbac.authorization.k8s.io name: java-operator-ex #Asubjects: - kind: ServiceAccount #B name: java-operator-ex Namespace: gitops #C#A Reference to the java-operator-ex ClusterRole
#B Reference to the java-operator-ex service account.
#C Namespace of the service account.
We looked into how to define an identity for the operator through a service account and how to grant permission with the help of Kubernetes RBAC. With the help of Role and RoleBinding, we can scope the operator’s permission to the namespace level. And we can expand the scope to the cluster level through ClusterRole and ClusterRoleBinding. Defining permission only privileges the service account to modify the CR. But we also need a specific scope for how the operator should observe the state of resources in Kubernetes.
3.2.2 How the operator observes change events
Kubernetes APIs support a watch verb that publishes resource events when a resource or CR changes state. By making watch requests to the Kubernetes API server, the controller in an operator monitors the change events related to CRs. The watch API request requires specifying a namespace input parameter for a given resource type, where you can use one namespace or a list of namespaces. A good practice followed by operator tools is to expose a WATCH_NAMESPACE environment variable instead of hard-coding the value of the namespace in the code, which allows setting the context. Before running the operator, you can set the environment variable, for example, WATCH_NAMESPACE=random namespace value, and the operator will only watch the CR in the “random” namespace. Using the WATCH_NAMESPACE allows setting the scope of operator deployment combined with permissions through Kubernetes RBAC. Figure 3.13 showcases the impact of setting WATCH_NAMESPACE with operator deployment.
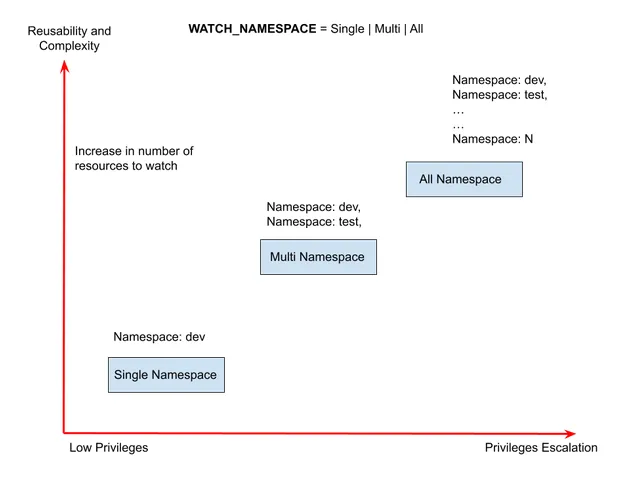
Figure 3.13 Operator observes changes to custom resources based on namespace scope levels.
When the WATCH_NAMESPACE is set to a specific namespace, it will only require the least privileges and be bound to the namespace. Changing the context to cluster-wide will require cluster-level permissions and increase the complexity as the operator must watch resources in all namespaces.
NOTE The ****Quarkus-based Java operator uses the format quarkus.operator-sdk.controllers."<name of the reconciler".namespaces=<comma-separated list of namespaces> to set the watch parameter for the reconciler.
For example, GitOps operator example, we can run the operator with the argument shown in Listing 3.18.
Listing 3.18 Running GitOps operator locally with watch parameter set to a list of namespaces
mvn quarkus:dev '-Dquarkus.operator-sdk.controllers."gitopsreconciler".namespaces=’default,gitops-demoapp, gitops-demoapp-second'By default, the GitOps operator is set to watch all namespaces. We can deploy the GitOps operator with ClusterRole and ClusterRoleBinding to the default namespace and create a sample CR in the namespace, for example, gitops-demoapp and gitops-demoapp-second, as shown in Figure 3.14.
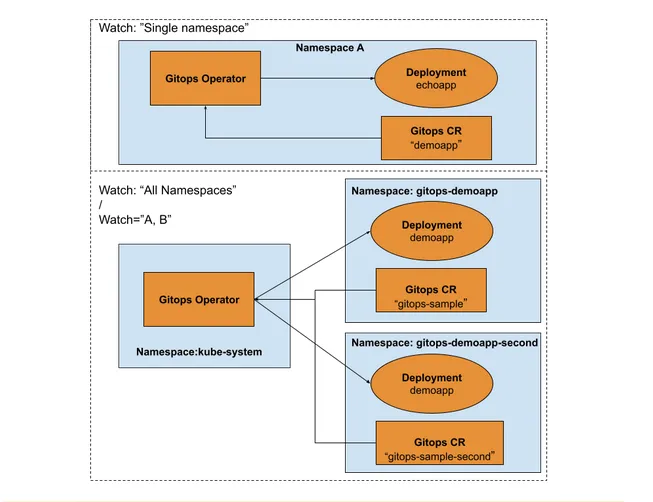
Figure 3.14 Scope of the operator can be set through the watch namespace parameter. When the watch parameter is set to namespace “A”, the Gitops operator manages “demoapp” CR in the namespace “A” boundaries. When the watch is set to All namespaces, the Gitops operator manages CR in all the namespaces.
We have seen how to deploy the Gitops operator to a specific namespace; the default mode for deploying the Gitops operator is set to watch all namespaces. The GitOps operator is deployed to the default namespace with the ClusterRole and ClusterRoleBinding discussed in the previous section, which allows the creation and modification of resources in all namespaces.
Let’s try to create two namespaces, gitops-demoapp and gitops-demoapp-second. Create a sample CR to deploy a simple demo application with the help of the GitOps operator, as shown in Listing 3.19 and 3.20.
Listing 3.19 Deploy the sample CR in gitops-demoapp namespace
$ kubectl create namespace gitops-demoapp$ kubectl apply -f - <<EOF---apiVersion: com.github.k8soperators/v1alpha1kind: GitOpsmetadata: name: gitops-sample namespace: gitops-demoappspec: url: "https://raw.githubusercontent.com/k8soperators/sample-yamls/main/kubernetes-quickstart/src/kubernetes/kind.yml"EOFLet’s create another namespace with the name gitops-demoapp-second and a sample CR.
Listing 3.20 Deploy the CR and check the status
$ kubectl create namespace gitops-demoapp-second$ kubectl apply -f - <<EOF---apiVersion: com.github.k8soperators/v1alpha1kind: GitOpsmetadata: name: gitops-sample namespace: gitops-demoapp-secondspec: url: "https://raw.githubusercontent.com/k8soperators/sample-yamls/main/kubernetes-quickstart/src/kubernetes/kind.yml"EOFWe can check the two sample CRs created for the GitOps CRD type, as shown in Listing 3.21.
Listing 3.21 Get the deployment for all namespaces
$ kubectl get gitops.com.github.k8soperators --all-namespacesNAMESPACE NAME AGEgitops-demoapp-second gitops-sample-second 24mgitops-demoapp gitops-sample 26mListing 3.22 shows the deployments of demo apps in the gitops-demo and gitops-demo-second namespaces by the gitops operator deployed in the default namespace.
Listing 3.22 Get the deployment for all namespaces
$ kubectl get deployments.apps --all-namespacesNAMESPACE NAME READY UP-TO-DATE AVAILABLE AGEdefault java-operator-ex 1/1 1 1 39mgitops-demoapp-second demo-app 1/1 1 1 30mWe looked into how to define permissions for the operator and how the operator observes resources in multiple namespaces. Next, we can review some common issues with the deployment of operators with the scopes.
3.2.3 Challenges with the scope of operator deployment
We have seen how you can deploy operators into specific namespaces and in the cluster scope mode. Each type of deployment has its own set of challenges
The Limitations of a Namespace-Scoped operator
The challenges with namespace scope arise from the fact that the CRD will always be Cluster scoped, and there can only ever be one definition on a cluster. API changes in a CRD can break between different versions of an operator, so managing one operator install is easy, and managing multiple operator installations is difficult. Say we have a Kubernetes cluster with two different users. Each installs a different version of the same operator in different namespaces. One of the versions of the operator has breaking changes in its API that won’t work with the previous version. What happens is missing parts of the API required for one of the operators are not present on the cluster, as we only have one CRD for the kind. One of the operators will crash or panic and fail, as shown in Figure 3.15, even though it is installed correctly.
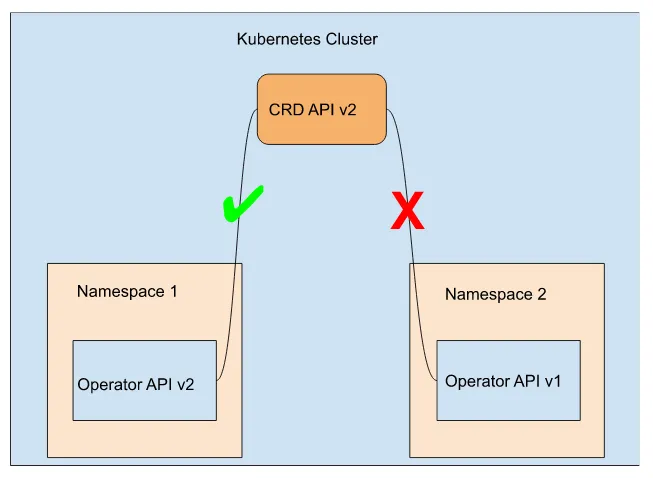
Figure 3.15 Namespaces scope API limitations
This gets more complicated as operators can use other operators to install components, and you don’t always have a choice in what version of an operator is installed. Hence, tracking down possible failures and fixing the incompatibility gets harder. A cluster-scoped operator doesn’t have this difficulty because you will only ever be able to install one cluster-scoped operator on the cluster, and to consume it, you only need to pass in a CR.
The Limitations of a Cluster-Scoped operator
The main consideration for cluster-scoped operators is around security concerns. A cluster-scoped operator will have access at a cluster level to the resources assigned to your operator’s service account via its cluster role and cluster role binding. As such, any common vulnerabilities and exposure (CVE) that your operator could become exposed to would have a much greater chance to impact you across your cluster due to the footprint of your operator being cluster-wide. That is not to say that any CVE would not be as damaging in a namespace-scoped operator. The permissions assigned to a namespace operator will be confined to a single namespace boundary.
That said, as a whole, cluster scoping an operator is much less troublesome in the long run. Before selecting your scope for an operator, you should think about these questions.
-
Is your operator going to an internal component to some bigger application and doesn’t have a life outside the bigger application? Namespace scope.
-
Is your operator going to be an internal component that multiple applications can consume? Cluster Scoped.
-
Does your operator need to be namespace scoped to limit who can see and use your operator? Namespace scoped
-
Are there security concerns sharing operators in a multi-tenant environment? Namespace scoped
3.3 Summary
-
Operators have many deployment methods, such as running locally, deploying an operator container on a cluster, OLM, Operator Hub, and Helm charts.
-
Operators can be debugged locally by attaching your IDE to the process running on port 5005
-
The main components required for an operator to function are the CRD to define the new API kind. The operator deployment to install the operator. The operator pod hosts the operator code. As part of the operator code, the controller monitors and acts upon the new CRD kind. The service for metric and health endpoint, and finally, the service account, role binding or cluster role binding, role or cluster role for RBAC.
-
Operators leverage RBAC via a service account owned by the operator to allow access to specific resources in the cluster.
-
Operators can be scoped to access resources on namespaces, multi-namespaced, or cluster-wide level via RBAC permissions.
-
Managing namespace-scoped operators can be difficult and cause API conflicts due to CRD always being Cluster scoped.
-
Cluster-scoped operators introduce additional security concerns.